12. Transformations
Sometimes the available document fields are not exactly what the User wants, or the values associated to those fields are not in the appropriate format, or are just plain wrong. Other times, the information that the User wants to see is not even available in the available fields. For all the above cases, transformations can come in handy.
Transformations are a basic component of TIM and are already used under-the-hood in lots of places. Transformations are responsible for a big part of the cleaned data that is available, for the harmonisation between entity names, the display of autokeywords, the proper formatting of patent CPC classification and Scopus Journal categories and so on.
Transformations are used to either add or modify existing fields that exist in TIM’s database and create new fields that can be used instead. This is an important point: existing fields are never modified; all changes result always in a new field. These fields can hold values from other existing fields or from external data that the User themselves provide.
For example, a User may create a transformation to substitute some organisation names with names of her own, or substitute multiple duplicate organisation names with one single name. Or she might want to create a new field that assigns a value of 1 to specific organisations that fulfill specific criteria (e.g. organisations that are funded by a certain funding agency). This field may be later used to filter for just those organisations.
Users with at least advanced accounts can create their own transformations. Then, different types of transformations are available depending on the level of the User. The transformed data or newly created field(s) can then be analysed and displayed using Custom pages.
Warning
Transformations are a powerful feature of TIM and require that the User is at least familiar with some file formats (xml, csv etc should not sound too cryptic!) and is not afraid to dive deep.
Experimentation and tinkering may be required to get the desired results.
12.1. Creating a Transformation
There are multiple types of transformations, but the one you will almost always want to use is the subst transformation.
Creating a new transformation is a three-step process: First you need to create the appropriate transformation files, then you upload them to TIM and finally you need to register the transformation in the system.
12.1.1. Creating the transformation files
Two files need to be provided by the user:
an
.xmlfile describing the “recipe” for the desired transformation.An
.csvfile (comma-separated values) holding the list of actual transformations: original value of an existing field and desired value(s) to populate new field(s).
Note
The two files must be identically named, and must both end in _substm.
For example EUcountries_substm.csv and EUcountries_substm.xml.
12.1.1.1. XML file
The following is a typical .xml file used for one of the most common transformations in TIM:
<subst source="_any" separator=",">
    <mfields>
        <mfield tag="emm:affiliation" attribute="name" pos="0" />
    </mfields>
    <sfields>
        <sfield tag="emm:affiliation" attribute="cleanname" pos="1" defaultAttribute="mrgename" />
    </sfields>
</subst>
mfields are the match fields that we are going to be reading from, and sfields are the substitute fields, the new fields we are going to be creating.
To see a full list of the tag/attributes (= fields) available, please see Fields in TIM.
The important parameters here are tag , attribute, pos and defaultAttribute.
In general, a TIM field of this format: XXX_YYYY__ZZZZZZ translates to tag:XXX:YYYY, attribute:ZZZZZZ.
Example
The field emm_affiliation__name translates to tag =”emm:affiliation” and attribute =”name”
pos refers to the position in the Excel file with the list of transformations. 0 is the first column of the Excel file, 1 is the second column, and so on.
defaultAttribute (optional) is the attribute we want to fall back on, for all the other documents that are not affected by the specific list of transformations.
If this is not present, the field will not be generated at all for non-matching documents.
So, to put this all together, this “recipe” reads as:
Read the first column of the supplied Excel file (
pos="0") and consider the supplied values as values of the fieldemm_affiliation__namein every document.Every time one of these values is matched inside a document, create a new field called
emm_affiliation__cleannameand fill it in with the respective value inside the supplied Excel file, in column 2 (pos="1").For all other values of field
emm_affiliation__namefound in all the dataset documents that do not exist within the supplied file, create the new field calledemm_affiliation__cleannamebut this time fill it in with the value of fieldemm_affiliation__mrgename(which is the default entity name field shown in default TIM graphs).
12.1.1.2. CSV file
The .csv file can either be created in Excel or in a simple text editor, like notepad, if you are on windows, or TextEdit if you are on a Mac.
It will need to be saved in csv format AND the filename will have to end in _substm for TIM to recognize it as a substm-type transformation file.
We will go through an example to illustrate how to create the needed files.
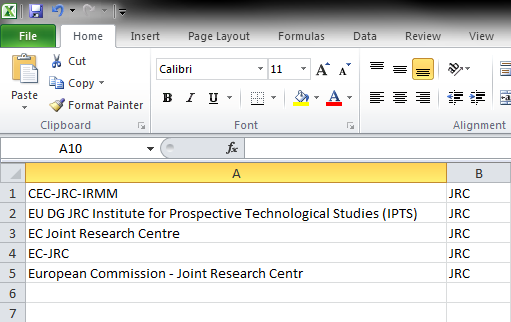
Let’s say we created a JRC-centric dataset and are looking at an organisation graph. There are multiple organisation name values that refer to the JRC, so we want to replace all of them with a single name. These values are the following:
CEC-JRC-IRMM
EU DG JRC Institute for Prospective Technological Studies (IPTS)
EC Joint Research Centre
EC-JRC
European Commission - Joint Research Centre
What we want is to create a new text file that contains the above variants and maps them to the same name selected by us, e.g. JRC. The original and the new name should be separated by a comma. The final file should look like this:
CEC-JRC-IRMM, JRC
EU DG JRC Institute for Prospective Technological Studies (IPTS), JRC
EC Joint Research Centre, JRC
EC-JRC, JRC
European Commission - Joint Research Centre, JRC
Please take note that if some of the variants contain commas inside, you will need to enclose the whole variant within double quotes, e.g. for a variant like this:
European Commission, Joint Research Centre, Institute for Transuranium Elements
the final line should be:
"European Commission, Joint Research Centre, Institute for Transuranium Elements", JRC
Note
There is also the option to provide a tab-separated value file instead, (making the appropriate changes in the XML file, whose description follows), but it will still need to be saved as .csv.
This variant is sometimes easier, because it doesn’t require putting the variant in double-quotes.
However, it will require this for fields that contain tabs!
Don’t forget to save the file with the .csv suffix, otherwise the file will be saved as .txt and will not be recognized by TIM.
Also remember that the filename needs to end in _substm.
So for here, for example, the file could be saved as JRC_substm.csv.
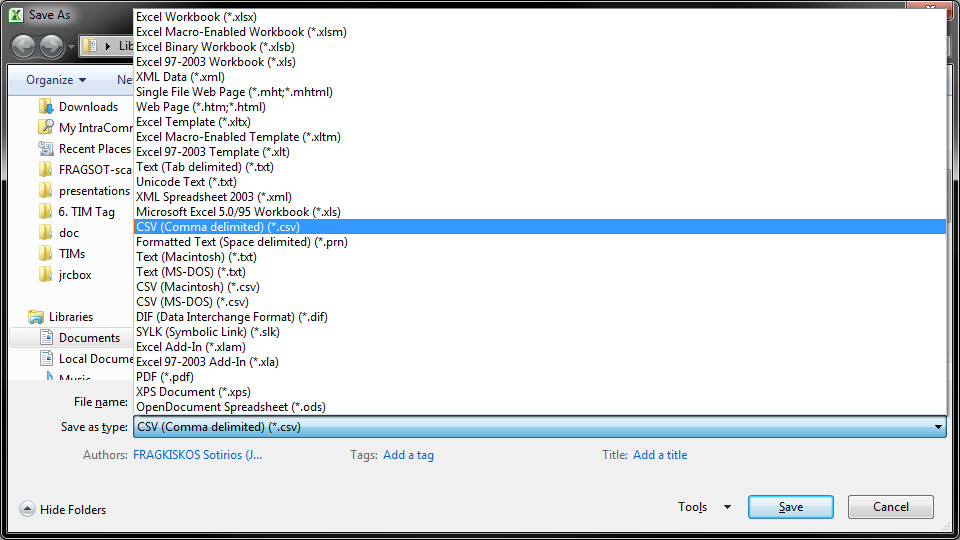
The other way to go about this, is to create a file like this in Excel:
and go to File>Save As to save it as a .csv instead of just saving it in the default format.
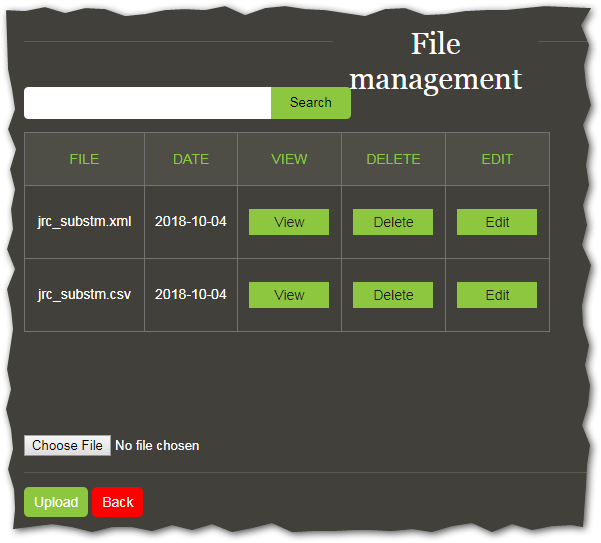
12.1.2. Uploading Files to TIM
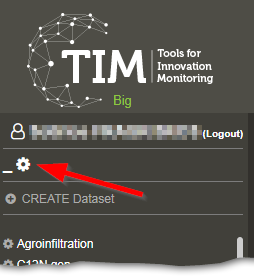
To upload a file to TIM, you need to access the File Manager Page.
This is located in Space Settings, accessed by the cogwheel on the upper left side of TIM and then selecting File Management.
Then you click on Choose File, select one of the two created files and then click on Upload.
Repeat for the second file.
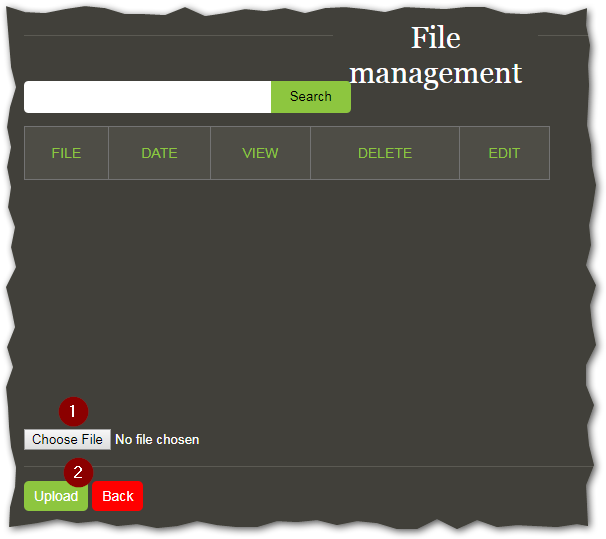
If you succeed in this, you should see the two files listed when you click on Search on the top of the page.
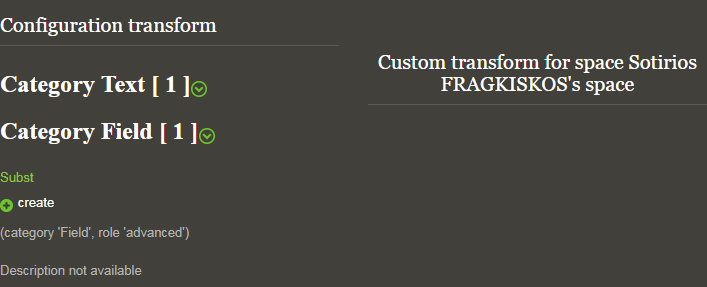
12.1.3. Registering the transformation
Next, the actual transformation has to be put in place in TIM.
Go back to Space Settings and click on Dataset transformation.
Expand the category Field and click on create under Subst.
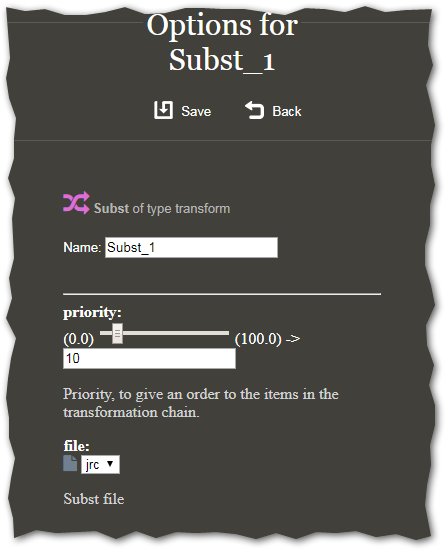
Here you select a name for your transformation, a priority (when should it be executed with respect to other transformations? if in doubt, leave this at 10), and the file you created.
If the file is not available in the drop-down menu, you should double-check that you created both files and they end in _substm.csv and _substm.xml, as discussed.
The transformation we performed is illustrated in the image below.
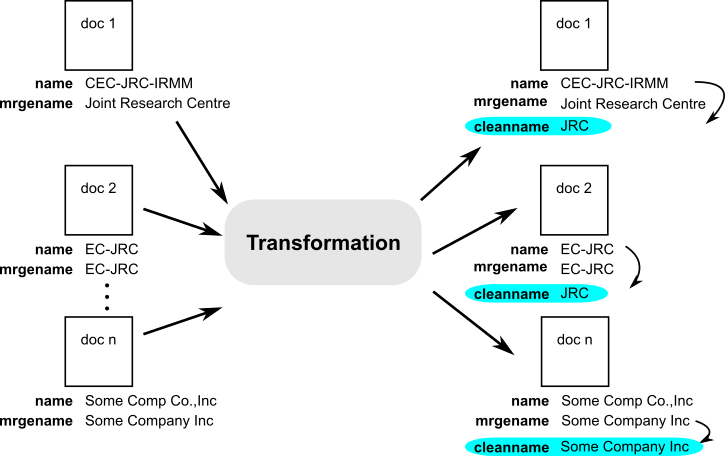
The image shows a series of documents with a different emm_affiliation_ name value.
These are the documents inside a single dataset.
After they are fed into the transformation, they all acquire a new field, named emm_affiliation__ cleanname.
Docs 1 and 2 get the value that we gave in our .csv file, as the respective emm_affiliation__name values, CEC-JRC-IRMM and EC-JRC, where found.
Doc n still gets an emm_affiliation__cleanname field:value pair, but the value is the one of emm_affiliation__mrgename, which should be a safe choice.
For a more thorough discussion on the affiliation fields available and their meaning, read affiliation processing.
Note
The user-defined transformations can be specific either to the dataset, or to the Space. In the first case, the modifications to the data will apply only for the specific dataset. In the latter case, the modifications will apply to all the datasets in that space and will be visible also for other users that might have viewing or editing rights on that same space. The transformation files, however, are always going to be uploaded from the file Manager that exists in the Space Settings page.
12.1.4. Next Steps
The transformation is now in place and will be applied to all datasets of the space, from the moment the User refreshes the dataset.
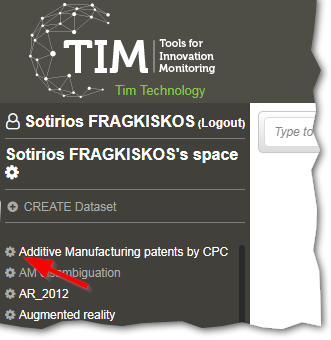
To refresh a dataset, click on the cogwheel next to the dataset (see Fig. below), hit on the refresh link, and then Open Dataset on the top of the menu.
To actually see the effects of the transformation, you will have to create a new Custom page, that displays the newly-created field.